On Windows:
Use the setvars.bat script on Windows, located in your JDeveloper\jdev\bin directory to set the JAVA_HOME and PATH environment variables. For help on using the setvars script, just execute setvars.bat and usage examples will be displayed.
Example:
setvars -go
On UNIX (Bourne Shell):
Set the JAVA_HOME environment variable and add the Java2 SDK's bin directory to your PATH.
Example:
export JAVA_HOME=/usr/java/jdk1.3
export PATH=${PATH}:${JAVA_HOME}/bin
Then execute the run script (or run_with_tomcat) located in the JBoss/bin directory. ( For example, this might be C:\JBoss-2.4.4\bin).
After JBoss is started, you will see many lines of information printed to the command shell.

Creating a Library in JDeveloper for JBoss
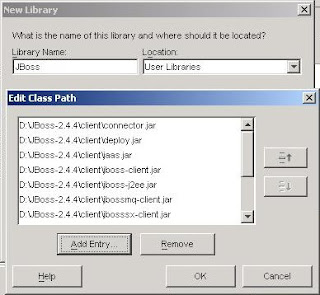
Oracle9i JDeveloper needs a library definition which contains all of the client side libraries from JBoss to test an Enterprise JavaBean deployed inside JBoss. All of these archives are located in the client directory under the JBoss directory. (For example: C:\JBoss-2.4.4\client). Create a new Library in JDeveloper, call it "JBoss" and add all of these .jar files to the library. Here is an example of the library definition as created with JDeveloper:

Creating a Simple EJB
Create a New Stateless Session Bean. This is a choice under the Enterprise JavaBeans category from the New Gallery. Follow all of the defaults provided by the Wizard. In the Enterprise JavaBean Wizard, click Next to accept all defaults, then click Finish. In the EJB Class Editor, select the Fields tab, and add a new field called "info". This creates a method on the EJB that can be invoked in the EJB test application.

Creating a jboss.xml File for EJB Customization.
This step is not required, however JBoss, like other Application Servers support vendor-specific configuration options for the Enterprise Java Beans. One reason to use a jboss.xml file is to modify the JNDI name of your EJB. More information on jboss.xml is available in the JBoss documentation.
To create a jboss.xml file in your project, simply:
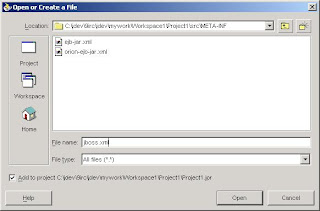
*Click the Open menu item from the File Menu.
*Navigate to the META-INF directory under your source path.
*Enter jboss.xml as the filename.
*Edit the newly created XML file manually.
You can include this in the EJB's .jar file at deployment time.

Here is an example of a very basic jboss.xml:
<jboss> |
Creating the Test Client for JBoss
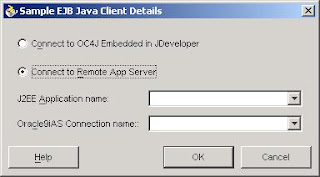
Create a test client for your EJB with the "Create Sample Java Client" context menu item from your EJB node in the Navigator. Choose "Connect to Remote App Server" in the details dialog, and ignore the values of the J2EE Application Name and Oracle9iAS Connection Name.
The default test client needs to be modified for use with JBoss because JNDI properties for JBoss are different than Oracle9iAS, replace the initial environment with the following:
env.put(Context.INITIAL_CONTEXT_FACTORY, "org.jnp.interfaces.NamingContextFactory");
env.put(Context.PROVIDER_URL, "localhost");
env.put(Context.URL_PKG_PREFIXES, "org.jboss.naming:org.jnp.interfaces" );
Add code to invoke the setInfo and getInfo methods previously added by the EJB Class Designer. Here is an example of the test application modified to invoke these methods:
Hashtable env = new Hashtable(); |
Deploying the EJB jar File to JBoss
Use these steps to create and deploy an EJB .jar file.
Invoke the New Gallery by clicking the New menu item under the File menu.
Choose the "Deployment Profiles" as the category, then "J2EE EJB Module (EJB JAR file)"
Click OK.
Leave the name the default "ejb1.deploy"
Just click "OK" on the J2EE EJB Module Deployment Profile Settings which is invoked, no changes need to be made here.
In the Navigator, right-click on the "ejb1.deploy" node.
Choose "Deploy to JAR file" on the context menu.
On the Message window, under the Deployment tab, a message will state the location of the newly created .jar file. Copy this file to the JBoss\deploy directory.
Here is an example of the text displayed in the Message Log on the Deployment tab:
Beginning to deploy to the EJB JAR file...
Wrote EJB .jar file to D:\jdev\9irc\jdev\mywork\Workspace2\Project1\ejb1.jar
---- Deployment finished. ---- Feb 6, 2002 2:58:05 PM
Once JBoss detects a file has changed in this location, it will automatically deploy your EJB. After JBoss has deployed the EJB, a message will be displayed in the console window in which JBoss was started.

Testing the EJB in JBoss
Edit your project properties, and remove the J2EE and Oracle9i iAS libraries, and add the JBoss library to your project.
Run the test client.
Verify that "Hello World" is displayed in the Message Log.
References:
JBoss


